Rooftop Solar Part 3 – working as it should (off-grid)

Rooftop Solar Part 3 is the third in a four-part series that explains the issues of installing solar panels and, optionally, a battery and what we consider best practices.
You should read these first to get the backstory.
Rooftop Solar Part 1 – where do I begin? examines my decision to go solar and what I found in dealing with the better-known solar installer brands.
Rooftop Solar Part 2 – All you need to know before you start looks at some of the shonky tricks to get you to order a system—whether it suits you or not. We looked at the incidence and tricks of upselling as not one of our readers paid the ‘super low advertised price’.
My journey started in 2019
It is fair to say that Rooftop Solar and I were not well acquainted. I could not have told you the difference between a string and a microinverter, panel types, controllers, batteries, and more. That is what the shonks (or is that sharks?) hope so they can spin you a line on quality, feed-in-tariff savings, environmental responsibility and, importantly, the STC (small-scale solar technology rebate).
My experiences with the shonks made me more determined to learn what I needed to make a wise decision—enough of the back story.
PS: As I wrote this, I realised it was pretty technical and aimed at the tech-savvy and tech-curious.
I also realised that I had become a rooftop solar snob, opting for performance and quality over economy. I am long past the point where the lure of a feed-in-tariff or STCs could shorten the return-on-investment period. By necessity I have moved to the pure benefits of being largely off-the-grid. This has become a tome about what you should do if money is secondary to quality and functionality.
There are some concepts you need to grasp.
- Solar from the sun creates DC voltage
- DC is converted into AC (what we use) or to charge a battery.
- DC to AC efficiency is how much DC kW is lost when inverting to AC. As a rule of thumb, it is around 20% across all processes.
- A battery is like a car’s fuel tank. The faster you drive, the faster it empties.
Finally, I have a CyberShack view at the end that may save you a couple of thousand words.
How much AC did I need?
Note: This segment is about AC only, not DC, that solar panels produce.
- AC 240V comes from the electricity grid or a DC-to-AC solar inverter.
- AC kW capacity is the total wattage load the inverter/panels/battery can handle.
- AC kWh means 240V/4.1A/1000W output for an hour, 500 for 2 hours, etc (also applies to DC).
I have previously written about Emberpulse providing detailed AC usage information compared to the quarterly electricity bills. Still, the quarterly bill provides enough information to estimate the average daily kWh usage and, importantly, use and cost over the four seasons.


Emberpulse showed that the AC inverter kW capacity needed to handle a peak load of at least 6000 watts (240VAC/25A/6000W = 6kW capacity, sometimes more if we turned everything on. Your electricity bill does not show that.
It also showed that on a typical summer day (24 hours and no rain), we would use between 25 and 40 kWh AC (with ducted air conditioning on). If we added a battery, it also needed to produce enough power to charge it.
The Catch22 is the number of DC panels to produce AC 50-70kWh per sunny day.
It was not until the installation produced power that I understood there is much more to calculating solar panel capacities.
Working backwards, we needed AC 6kW load handling and 70kWh 24-hour capacity, which is about DC 7.5kW load and 90kWh.
We settled on a DC 10kW (approx.) system. I sigh with relief as the big guys said a 6kW system and 4kW inverter was plenty for our use. They will do anything for a quick sale.
Why? A properly sized solar panel array and inverter can deliver the home’s power board wattage capacity (power, light, hot water, AC, etc.) using a mix of solar (whatever it produces at the time), grid, and, optionally, battery.
If your solar array is smaller or has a smaller inverter than your solar capacity (tricks to cut costs), you will use more grid or battery power.
We selected Enphase microinverters (more later) rather than a 10kW string inverter.
How many panels is that?
There are many terms, so here is an overview. It refers to DC voltage.
- DC voltage is what the panels produce.
- DC kW (kilowatt) capacity is the number of panels multiplied by their wattage. Think of this as car speed.
- DC kWh (kilowatt hour) is the energy it can produce in 24 hours. Think of this as fuel.
- These figures are indicative of sunny summer days and will be less for shorter winter and cloudy days.
For example, a 25-panel x 400W array (commonly called a DC 10kW system) produces from nothing (cloud/rainy) to about 3kWh (sunny) per panel per day or 0 to 75kWh (25 panels x 3 kWh = 75kWh). The maths is simple: 400W x 8 hours sunshine = 3.2kWh per panel.
We selected 24 x 405W Viridian U.K. Clearline Fusion panels (more later), giving us a maximum of 9.72 kW DC. These are top-quality panels on a roof with the right pitch and an almost ideal east-west sun path.
The best production we have seen on a January summer sunny day is DC 70kWh, not the theoretical 97. It is not the panel’s fault – 3kWh per panel per day is excellent summer performance for the Sydney region.
The difference is ‘efficiency loss’ due to manufacturing tolerance, dirty panels, temperature, roof pitch, orientation, cable loss, etc. And that is before the DC gets converted to AC with more losses.
Summary: To minimise grid power 24 x 7, you need enough DC kW panel capacity to meet your peak AC wattage load during daylight use (no battery) and battery capacity to meet your night use and rainy weather backup. Generally, the DC to AC process loss can be up to 20%.
Did my roof fit solar?
The short answer is no. It was a hip roof style that meant only a few panels on each side (12 panels or 5kW north, south, east and west), and many would be in the shade at important times of the day.

So, I looked at ways of placing 24 x 405W panels (originally 28 x 330W) to take advantage of the east-west sun trajectory.
Plan A, the initial solution, was a solar farm covering 75% of a little-used roof garden area. The panels performed best at a 33° pitch (for Sydney), so we created an array of seven panels wide (7m) and four panels high (8m) at a 33° pitch.

Oh, you need a Development Approval (DA) for that!
Why a DA? My property is strata and must comply with Class 2 building specifications. The solar farm was classed as construction. Ironically, bolting solar panels onto an existing roof is not a requirement, and residential housing does not need to comply.
Thus began the long, arduous, and overly complicated DA process. An architect drew up the plans, and we worked on the one-size-fits-all DA application, totally inappropriate for an established building. It required all sorts of things like environmental impact (there was none), waste management (none), stormwater management (none), neighbouring shading diagrams (yes, this is important), and a lot of unnecessary bureaucratic red tape.
We called that Plan A (ideal placement and pitch) and knew that we may need Plan B (reduced pitch and less efficient) or even Plan C (not even considered yet).
Long story short, over two years elapsed, and the Council refused the DA because Plan A would be a meter or so over the maximum allowable roof height. Read our separate guide Rooftop solar for strata.
We quickly altered it to Plan B
This was to have half the panels at 33° (7 wide x 2 deep) and half at about 20°. While that met roof height levels, it was not approved as it would have created a roof over the roof garden, essentially a third level, and there is a maximum of two levels in our area.
The council’s shortsightedness and virtually no way to challenge its decision meant the most efficient and socially/environmentally responsible solution had to return to the drawing board after several thousand dollars and two years had been wasted.
Plan C
As bad luck would have it, we live beside the sea, and the Colourbond roof (circa 2004) was rusted and needed replacement. We applied for a DA to convert the hip roof to a gable (Plan C), with faster approval after several months. We now had room for 24 panels – 10 on the north and 14 on the south-facing roof.


Conversion from hip to gable is relativity easy and cost-effective. Still, you may need a DA (although most residential builders and roofers will tell you otherwise, and I agree!). Flat roofs are not as efficient but still quite doable. The key is to expose the roof to maximum east-west sunshine.
Solar does not have to be on the roof. Consider a solar farm in your backyard. If it has an uninhibited view of the sky, it may be the best option for the whole or part of the array. It could incorporate into a shed, garage, carport, or granny flat. And look at BIPV (Building Integrated Photovoltaic) as all or part of the array (more later).

Summary: Rooftop solar needs the right roof! If you are serious about solar panels for a new build, you should start with the east-west roof design using BIPV.
We will discuss panel types, inverters and batteries later.
Panel efficiency
Walking around my suburb, I see dozens of solar installations with less-than-ideal pitch and orientation. One home has a pyramid style with four triangles facing north, south, east, and west. The east gets the morning sun, but the west is in the shade and vice versa. They get about 60% sun efficiency.
Another has an east/west Clerestory roof, and 50% of its panels only work in the morning or afternoon—a 50% power efficiency.
Yet another has 6kW of north-facing, east-west orientation panels, which is excellent in summer, achieving 75% but <50% in winter. He needs some south-facing panels but cannot cost-effectively expand the system due to the string inverter.


What panels did I choose?
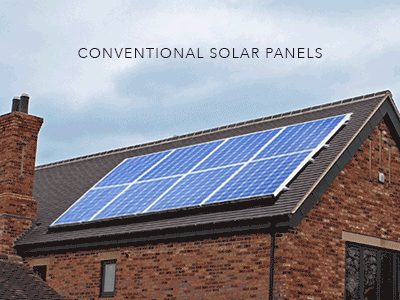
Once Plan C came into effect, I started looking at solar panels. I saw so-called Tier 1 400W+ bolt-on (BAPV rack mounted) rooftop solar panels from <$150 to well-known brands at >$500. The shonks all said they could supply better panels if I signed today! Despite marine-environment use being part of a non-negotiable brief, none recommended panels (or any other components) with a suitable rating. None could provide a brand’s website, model number or tech specs– it was ‘trust me!’
I had seen Roof Integrated Solar (Building Integrated Photovoltaics or BIPV), where the panels formed the roof, replacing roof cladding. These looked attractive, and as I had to replace the ColourBond anyway, it would give me an instant cladding ‘credit’ that later covered more than 50% of the panel cost.
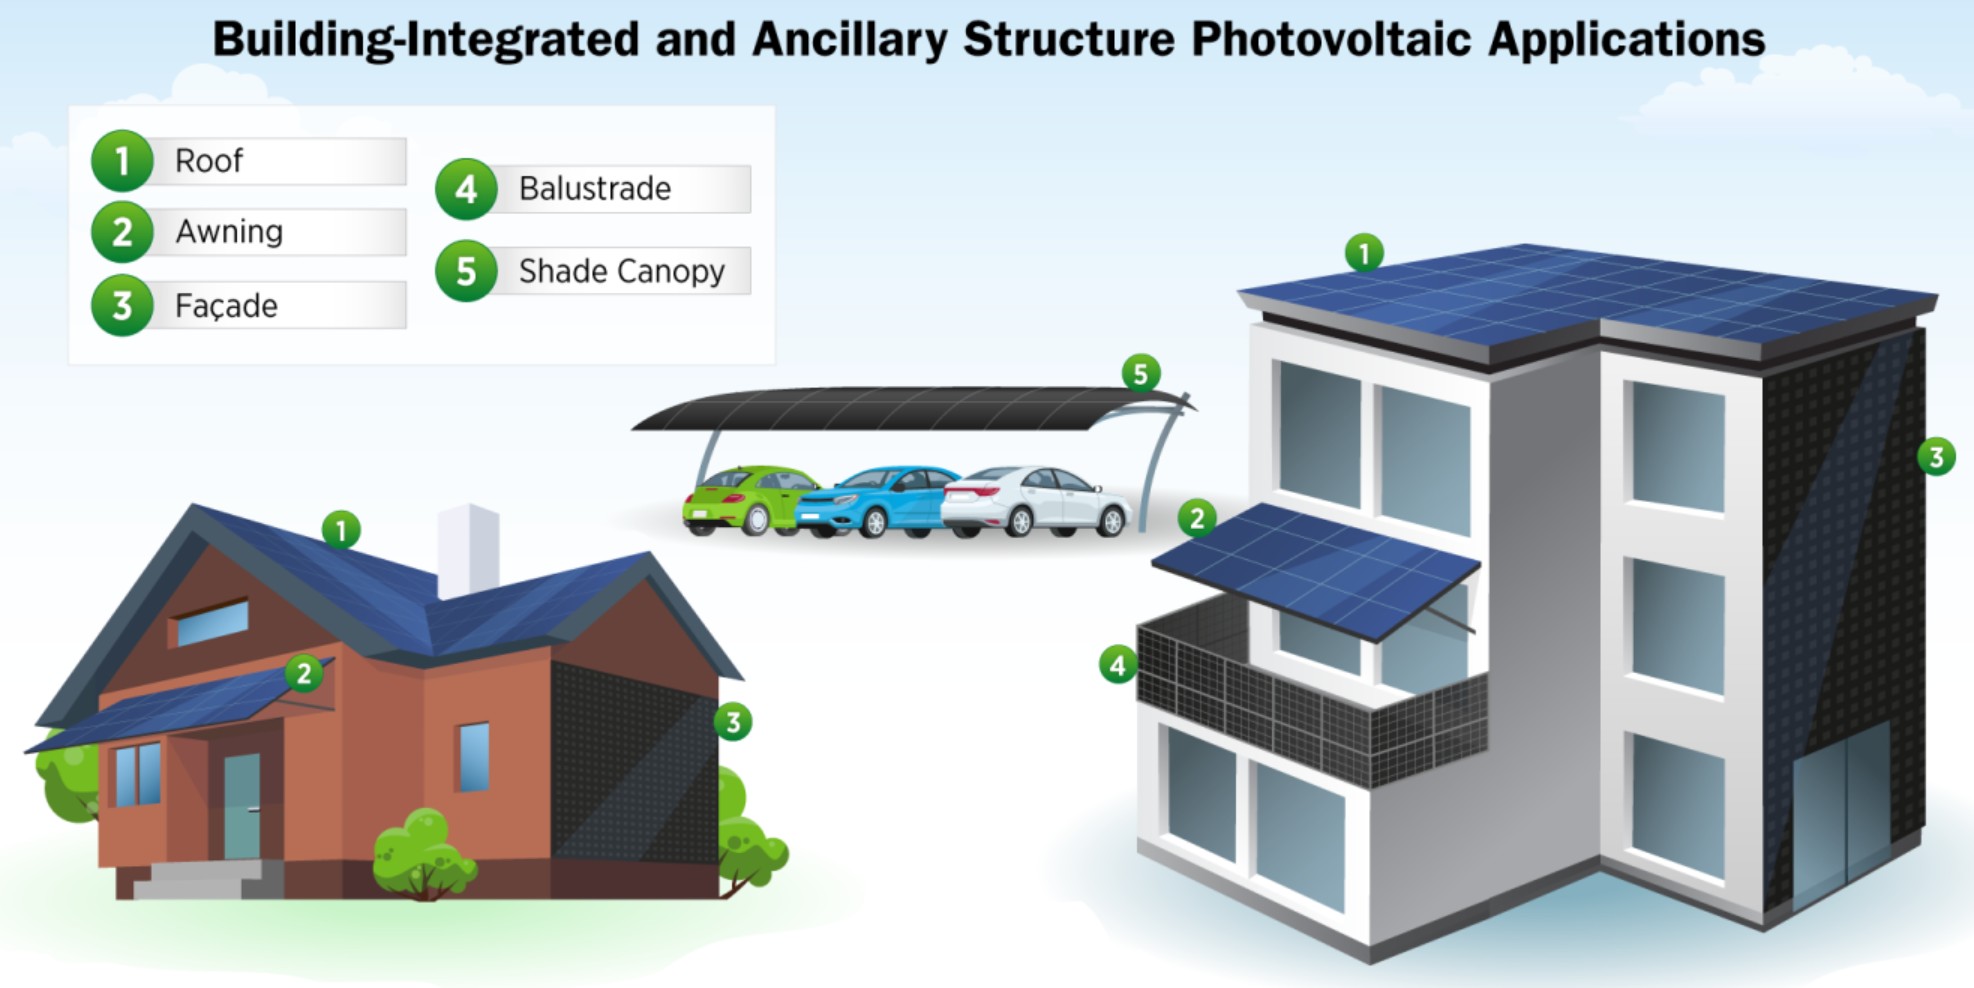
New builds, take note: You should seriously consider BIVP for aesthetics, technical reasons, and cost offsets, such as not having to use roof cladding.
Existing builds: BIPV will be less economical than BAPV unless you are replacing the roofing material. But if you have an expensive home and aesthetics are important, this option should be a serious consideration.
While I went BIPV the rest is just as applicable for BAPV.
I was also interested because
- On-roof rack-mounted solar panels (Building Attached Photovoltaics or BAPV) are a haven for birds and rodents living under them.
- BIPV usually have a higher marine environment tolerance (sealed units)
- Seaside wind lift is an issue that few BAPVs can handle.
- Hail and weather ratings are higher than most BAPVs.
- Fire certification is higher (we live adjacent to a national park and have fireproofed the building)
- They improve the energy efficiency rating (necessary for Nationwide House Energy Rating Scheme NatHERS certification).
- As these are sealed panel units, they last a lifetime.
- Way better ascetics and resale value
More on BIPV
I searched for BIPV, but most of the results were for commercial buildings that impressively designed and used BIPV as fascia, awnings, roofs, carpark shade, noise barriers, windows, etc., but little about domestic home use.
A recent Australian report shows BIPV at <1% of domestic installations compared to 99% BAPV (building-applied photovoltaics or rack mounted). To quote:
BIPV replaces traditional roof cladding — Colourbond, Tile, Slate, and more. In some countries, BIPV has become an indispensable part of new builds (70% in the UK). It provides shelter from wind, rain, hail, and heat. It can effectively increase a home’s energy efficiency, which helps to save energy, reduce carbon emissions, and protect the environment.
BAPV does not bring waterproofing or wind shielding and increases the building load. It is a serious waste of building materials.
Summary: BIPV was the way forward for me because I had to replace the roof cladding and convert it to a gable. So, I began a serious search.
Enter Viridian Solar BIPV
One name kept coming up – Viridian Solar in the UK. I contacted the company and found they had an exclusive distributor in Australia – Sydney-based SOllOS.
At that time, we were reapplying for a DA and had to prove that the Viridian Clearline Fusion PV16 M10 DC 31V/13A/405W panels were a suitable replacement for the Colourbond roof. Despite a global search, I found no other BIPV system compatible with as many different roofing materials—Colourbond, Slate, Concrete tile, Terracotta, Shingles, etc.


We found, and the Council accepted:
- They meet the mandatory seven-star NatHERS (UK) rating for new builds.
- They install like traditional roofing, attaching directly to the roof battens.
- High monocrystalline (mSi) panel efficiency, meaning higher kWh production than similar capacity panels.
- 1134 x 1722mm x 25kg each, plus a flashing kit
- 5.32 kPa wind uplift pressure (four times higher than most)
- Fire-rated – highest level BRoof T1, T2, T3 and T4 and AA Fire Rating to BS 476-3
- 15-year warranty and at least a 30-year life
- 90% power retention after 10 years and 80% after 25 years
- Waterproof to as low as 20° pitch (not suitable for flat roofs)
- Aesthetically better looking, leading to higher resale values
- Accredited by the Clean Energy Council (CEC) and approved for STC rebates
- Panel price approx.$500 plus a flashing kit – like other high-quality BAPV panels. Be warned that panels are only a part of the overall installed system price. See our cost estimates later.


Don Holley from SOllOS summed it up very well.
When building a new home, people don’t consider the payback period on natural stone vs. concrete, a granite benchtop vs. laminate, or premium fittings and finishes. They are prepared to pay for quality and beauty.
Mass-marketers’ promises of STCs, feed-in tariffs, and quick rooftop solar payback (ROI) have driven adoption. However, as your readers found, these systems always cost more than the lead-in price and cannot perform as well as a premium system.
Few premium products would stack up if we applied the same cost-benefit thinking to all our purchasing decisions. Rooftop solar focus must change to what you need for self-sufficiency and how long you want it to last.
Our build photos


Now for the techy bit of Rooftop Solar Part 3 – inverters, controllers, batteries and more
Inverters
Inverters convert DC power from solar panels to AC power for the household and export surplus power to the grid. Cheap inverters usually don’t have Wi-Fi or Ethernet comms (for an app), generally don’t support a battery and may need additional equipment like grid isolators, etc.

String Inverter
String inverters ‘string’ together (serial connection/daisy chain) DC solar panels. Using our example of 24 x DC 31V/13A/405W panels could mean the DC power surging around the wiring is 744 VDC – deadly.
Regulations limit this power, so 24 panels would likely use three x 3kW strings. This also limits the peak wattage it can deliver. Any excess power the panels produce is ‘clipped’ (converted to heat), which can lead to overheating. Hey, they are cheap!
String inverters are a single point of failure—if the string inverter or one panel is faulty, there is no power. All panels must be the same. This means the maximum array output is the string’s lowest-performing panel (all panels are connected in series, and one in the shade limits all).
Many readers have complained that if a panel fails and they cannot get the exact replacement, the whole solar panel array must be replaced (or they can convert panels to micro-inverters at their cost).
Cheap string inverters are also a prime contributor to ‘bad voltage harmonics’, best described as the ‘invisible’ pollution to other loads and neighbouring electrical consumers connected to the same grid transformer. They can also inject DC into the AC grid due to current sensor error, tolerance of power switching device, asymmetry of PWM gating driving pulses, etc.
Most string inverters cannot use both solar and battery to power your home in a blackout.
Typically, a 10kW costs from $2,000 to 4000 and has an 8-10-year life.
Microinverter
There are a few brands of microinverters, but 99% choose Enphase. Combined with the Enphase IQ controller and IQ battery, they create a fully independent microgrid. The electricity grid is an isolated provider or recipient of AC power.

Microinverters are placed on every panel (panels are not interconnected). These convert the panel’s DC output to safe 240V AC at a few amps/watts, which a controller aggregates and sends to the household or an AC-coupled battery. The controller can import from the grid if more kWs are needed or export if more power is produced.
We chose Enphase IQ8AC 366W microinverters for several reasons.
- It created a micro-grid independent of the electricity grid when installed with an IQ Controller and IQ Battery.
- It can simultaneously power a home and charge batteries during a blackout (most string inverters cannot do that)
- Sunlight Jumpstart technology enables automatic system recovery, even if your battery is fully depleted after a prolonged outage
- It enables per-panel output monitoring.
- If a panel fails or a microinverter fails, the system keeps going
- The energy efficiency rating is 97.3% of DC kW converted to AC (compared to 75-80% for string).
- The 24-panel array can provide nearly 240V/37.5A/9000W AC load output
- 25-year warranty (most string inverter warranties are between 5-10 years)
- Can add more and disparate panels and batteries without changing the controller.
- We could place them inside the roof cavity for increased protection from the elements.
They last 25+ years and cost approximately $200 each, or $4,800. A decent string inverter lasts 8-10 years and about $4000, so it was a no-brainer.

Controller with Comms gateway
We are using the Enphase IQ Systems Controller 3 INT, which is approximately $2,000. As the panel microinverters feed the house and battery directly, the controller ensures a safe microgrid AC connection (when the electricity grid goes down, it instantly stops import or export). Its microgrid seamlessly supplies a mix of solar and battery power to the house.
The IQ Controller has comms via Wi-Fi, Ethernet, cellular, and direct connection. In our case, Wi-Fi 2.4GHz is very strong on the roof. Otherwise, we could have used an Ethernet cable from our mesh router.


Enphase app – Brilliant
The Enphase App (Android, iOS or web browser) supports:
- Self-Consumption: Use battery-stored solar to power your home after the sun goes down or is unavailable.
- Savings mode: Minimize the use of electricity from the grid when the electricity rate is higher
- Full Backup:100% of the battery is for backup.
- Storm guard automatically ensures batteries are filled to 100% in case of a blackout.
- Several reports, including real-time performance
- Individual panel performance.
The app is the sweet spot for using Enphase microinverters (panel agnostic) and Enphase batteries. It also handles an EV charger (not in Australia yet, but expected mid-year).
I find it very easy to use, and I love the live feed that shows energy flow direction. I have not set the grid energy rates yet (as I may soon change providers), but you can then use the time/season rates to top up the battery most economically if there is not enough solar power.
The following screenshots are self-explanatory.


Battery
I could not see the purpose of only using solar power during the day, as peak power grid use charges apply from 2 to 8 PM and shoulder rates from 7 AM to 2 PM and 8 PM to 10 PM. That is right—the only ‘cheap’ power is from 10 PM to 7 AM.
Then, the argument comes in about battery capital cost versus savings and what happens on rainy days when the solar panels are not producing and the battery is exhausted. In reality, a battery only marginally extends ROI for heavy users but may not be economic for light users.
We chose 2 x Enphase IQ 5P 5kWh AC-coupled batteries, which have a total storage capacity of approx., DC 10,000kW and cost about $5000 each.
These use lithium iron phosphate (LFP), which is vastly safer than lithium-ion – I would not like a 10kW bomb on my roof!
LFP has at least an 80% capacity after 15 years/6000 full charge cycles (it is now advertising 7300 cycles), and based on our use and charge cycles, that will be closer to 20 years.
Each battery has six embedded and swappable IQ8 microinverters that deliver 3.84kW of AC power—7680W from two batteries. Remember this is only when the IQ8 solar panel inverters (approx. 9000W) can’t provide power. In all, we have up to 16,000W on demand during the day and 7680W at night (the batteries can handle a 200% startup load)!

To be clear, a battery is measured in DC storage (10,000kWh)
The key is how much AC kWh it can produce for an hour, e.g., 7680W for an hour (7.68kWh), 3840 for two hours, 1920 for four hours, etc.
On a sunny day, the batteries charge in under three hours from 9-12 AM and then cut in at around 7 PM to handle cooking loads and more. At 10 PM, we turn off the ducted air conditioner and use a smaller split system in the bedroom. The battery lasts all night, and the process starts again.
If there are rainy days, you can set a schedule to charge the battery using off-peak energy, which costs a couple of dollars.
These are large—980 mm × 550 mm × 188 mm x 80kg and have an IP67 rating. While not required, we built a weatherproof enclosure for aesthetics and to help protect them from the seaside elements.
Battery experience
After a few weeks of experience, I kind of wish that I had bought three batteries. 7.68kWh sounds great but it can exhaust in a few hours. Imagine you have a 4-5kW air conditioner, 2kW dryer, 1kW dishwasher and a base load of about 1kW, and it can be exhausted in a few hours. We have become energy misers at night to reduce possible grid costs.
- Dishwasher, washing machine and dryer only in the morning (usually from solar)
- Ducted AC all day if it is hot until about 10 PM.
- Bedroom AC from 10 PM to 7 AM
- Off-peak battery charge only if it is raining or too overcast from 10 PM to whenever.
This regimen means the battery gets us through the night in good weather and charges in about three hours from 9 to 12 AM.
In bad weather, we use off-peak grid charging, and the battery gets us through the day and part of the night.
Summary: A battery is a fuel tank. It has a maximum kWh capacity, and you need to size it accordingly for both nighttime and backup use. Smart charging using a mix of solar and off-peak power will reduce grid costs.
Installing more battery capacity than the panel array capacity is no issue. All that means is that the amount of power exported is less, and at 5c per kWh feed-in tariff, who cares?
Feed-in tariff (FiT) – a joke
In the last 14 days (1-14 January), with at least seven rainy days, we have:
- Exported 272kWh at 5 cents, or a massive $13.60 income!
- Imported 105kWh at an average of 35 cents, or $36.70 cost (about 24% of our power use).
- Used 438.3 kWh solar at no cost (about $160 value)
- Charged about $15 for the daily supply charge.
- That puts us at $122 ahead in 14 days. The odds are no longer in the energy company’s favour.
Now, that is not representative of a whole month or year. Sydney, for example, has 110 days of at least 75% sunshine and 127 of 75% or more cloud cover. I don’t know about those other 128 days! Sydney averages 7.2 hours a day of sunlight or 2628 hours yearly.
But here is the real measure. Our quarterly energy bill for summer is about $1000 for 13 weeks. On that basis, the bill would be $153.80 for two weeks, instead we are $122 ahead.
Our electricity bill for the last four quarters was approximately $3500, or $67.30 per week (it does not fully reflect recent price increases). See ROI later.
Installer
Sollos recommended Nik, a Central Coast installer who had installed Viridian panels, so I did not go to tender. He was also an Enphase installer, as well as other brands. Our negotiations were more about his portion of the overall cost.
It was not a case of him pushing Enphase but of him unbiasedly educating me about options. Remember that at that time, I was thinking of a smaller system with smaller batteries and had set a mental budget of $20,000.
Nik was quite open about the cost of the various options and how much he needed to make (which was entirely reasonable). He never attempted to upsell (perhaps because I was now an informed consumer), and we arrived at a logical outcome – 10kW BIPV with Enphase. I particularly liked the Enphase integrated app; it was all designed to work together.
We also looked at the under-performing, over-priced Tesla Powerwall 3 (new LFP model but only 10-year warranty and lower peak load), Sonnen managed battery (I decided that I don’t want external companies to manage batteries), and a few other options, but any cheaper batteries were Lithium-ion fire hazards.
As CyberShack readers are Australia-wide, I repeat my advice: Avoid the big guys and look for locals who have been in business for longer. It is even better if they have Enphase accreditation.
Rooftop Solar Part 3 install costs
The approximate costs for us were:
| 24 Viridian panels at $500 | $12, 000 |
| Viridian panel flashing kits for in-roof replacement | $3, 600 |
| 2 x Enphase batteries @$5000 | $10,000 |
| INT 3 Controller | $2, 000 |
| 24 Enphase microinverters $200 | $4,800 |
| Cabling, etc. (approx. 7-10 cents per kW) | $1,000 |
| Labour/installer (approx. 45 cents per kW) | $4,500 |
| Sundry (roof capping) | $2,100 |
| Roof cladding credit | -$10,000 |
| Total | $30,000 |
ROI
We cannot yet begin to amortise the cost accurately but as a guide
| 365 daily grid supply charges (nominal $1 per day) | $365 |
| 24% grid use (which we expect to reduce as we become more familiar with the system) | $750 |
| FiT $30 per month minimum | -365 |
| Net cost of electricity per annum | $750 |
That equates to a $2750 saving per annum or an 11-year ROI.
These figures are solely for my circumstances but illustrate how to work it out.
In Rooftop Solar Part 4, we will also examine the various energy supplier options.
CyberShack’s view – Rooftop Solar Part 3 is working as it should
Over the past few days, over 200,000 houses in and around Sydney have been without electricity during an unusually severe summer storm cell. We are fine!
Grid power quality due to ‘bad harmonics’ distresses sensitive electrical equipment, as the so-called pure-sine wave power it needs verges on square wave. That is why you must reboot TVs, routers, and smart homes. I am heartily sick of reboots—I have not had to do one in the past fortnight.
Energy costs (for me) have increased 49% over the past five years. Politicians promise relief, but prices are still going up. Once my current plan expires in May 2025, other comparable plans are already 10% higher.
Hopefully, my insistence on quality and the latest technology will reap dividends with trouble-free operation.
- Enphase Batteries – 15 years warranty or 7300 charge cycles before retaining 80% capacity
- Enphase Microinverters – 25 years warranty
- Viridian Panels – 15-year panel warranty, 25-year performance warranty and an expected 30-year life.
- Flexible panel and battery replacement
- Vastly higher reliability and lifespan than string inverters and cheap panels.
- Expected ROI based on current-day prices is 11 years.
Overall, I am ecstatic with the preliminary results. I have not stopped smiling since its install in late December.
Knowing what I know now, cheap solar is for mugs.
If you have any quick questions, use the comments facility. If any reader wants to share their experiences, please email me at [email protected] and help us build a more authoritative rooftop solar series.
Rooftop Solar Part 4 is scheduled for late June 2025 after six months of use and more investigations into grid energy suppliers.
Read Rooftop solar for strata guide.
Rooftop Solar Part 3, Rooftop Solar Part 3, Rooftop Solar Part 3, Rooftop Solar Part 3, Rooftop Solar Part 3, Rooftop Solar Part 3
Brought to you by CyberShack.com.au